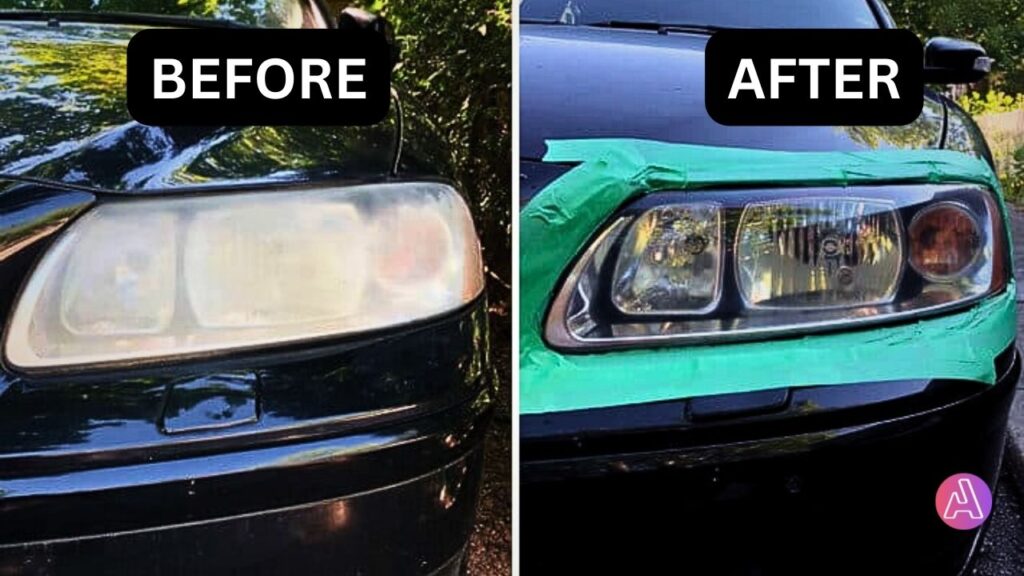
Foggy headlight is a frequent problem that many car owners experience. The transparent plastic headlight covers may become cloudy and opaque over time. This not only detracts from the aesthetic of the car, but it may also affect how bright and effective the headlights are at night, which puts people’s safety and visibility at risk. This post will look at several ways to efficiently clean hazy headlights and bring back their clarity.

ADVANTAGE
- You will get masking tape, light sanding discs and wax protectant with the kit.
- Removes yellowing and buildup without damaging plastic lens
- Easy to use
- Affordable
DISADVANTAGE
- Take more time then it should
How To Use This Product?
To begin you’ll need components included in the 3M™ Headlight Restoration kit, A household drill that is 1,200 – 1600rpm.Be sure to wear proper respiratory protection and safety glasses, especially when sanding.
We suggest you use the drill shown below.(its affordable and perfect for this job)

Clean the lens with soap and water then after drying, tape off the area around the lens. With the power disconnected, mount the backup pad onto the drill.Follow the drill manufacturer instructions to properly attach the backup pad securely into the drill. Attach and center the P500 grit gold-colored abrasive disc to the backup pad.
Using medium to light pressure begin sanding to remove the yellow in its surface defects from the lens. A slow and steady back fourth action will be most effective. When the disc is clogged or no longer sanding effectively replace it with a new P500 grit disc.
Some notes about drilling.
Do NOT use excessive pressure down on the drill or the headlight lens. Do NOT hold the drill in one place while sanding this can cause the lens surface to heat up and smear becoming difficult to remove. Hold the drill flat or at a very slight angle and control the drill by using a slow steady speed across the lens.
Wipe off the lens and inspect it to ensure all the yellowing and defects have been completely removed. If yellowing defects or portions of the surface coding still exist continue sanding with P500 grit discs until they are completely removed. The lens should have a white evenly sanded surface that appears to look frosted. If any portion looks clear or glossy continue sanding it before moving to the next step.
Remove the P500 disc. Attach and center a P800 grit abrasive disc to the backup pad. These are the white sanding discs with purple printing on the back. Begin sanding using the same light to medium pressure as before making several passes over the entire lens to be sure that the P500 grit scratches from the previous step are reduced to P800 scratchs. Wipe the lens noticing if the scratches are finer, if coarse scratches are still visible continue sanding with the P800 until the coarse scratches are reduced.
Remove the P800 disc and apply the P3000 Trizact™ Foam Disc. This is the thin foam disc that looks green or grey in colour. Dampen the lens and the P3000 Trizact™ Foam Disc with the water bottle and then using the same light to medium pressure as before sand the surface to reduce the P800 scratches to P3000 scratches. Add a mist of water if the surface becomes dry while sanding. A white residual or slurry will build up on the lens indicating that you are reducing the sand scratches. Continue with 4 to 6 passes over the lens after you see white slurry, if you’re not seeing the slurry make 10 to 12 passes on the lens.
Extra sanding will make the next step easier and improve the final clarity of the headlight. Wipe the lens noticing if the scratches are finer and the lens appears clear. If coarse scratches are still visible mist the area with water and continue sending with the P3000 disc until the coarse scratches are reduced. It’s now time to polish the lens. Remove the P3000 foam disc from the drill and attach the orange foam compounding pad. Dispense a dime size amount of 3M™ Headlight Lens Polish onto the compounding pad and smear the polish with the foam pad around the lens before turning the drill on to reduce splatter.
Holding the drill flat polish the lens until the cloudy haze is gone and the clarity is significantly improved. If additional clarity is needed or desired add another dime-sized amount of 3M™ Headlight Lens Polish to the compounding pad and continue buffing. Remove the masking tape and wipe the lens clean with a 3M™ Microfibre Detail Cloth. Wash any residual spatter from the vehicle using car wash soap in a clean soft cloth.

ADVANTAGE
- Easy To use
- Only takes one step
DISADVANTAGE
- Takes time to deliver
How To Use This Product?
Clean it up first and then start off on the slow setting and then the maximum setting for the final policy on the edge of this, not on the center’s. Get the lights a little wet. Get that go back to the fifth to the 800 grit really wet it again and then just hit it again it will just burn the plastic. Keep polishing with the drill till your satisfied.

ADVANTAGE
- Faster then the other products
- Easy enough for less experienced DIY consumers
- Its not stingy with the consumables
- Instructions are simple
DISADVANTAGE
- (none found)
How To Use This Product?
( Its similar to the 2 shown above. )
Why is my headlight foggy ?
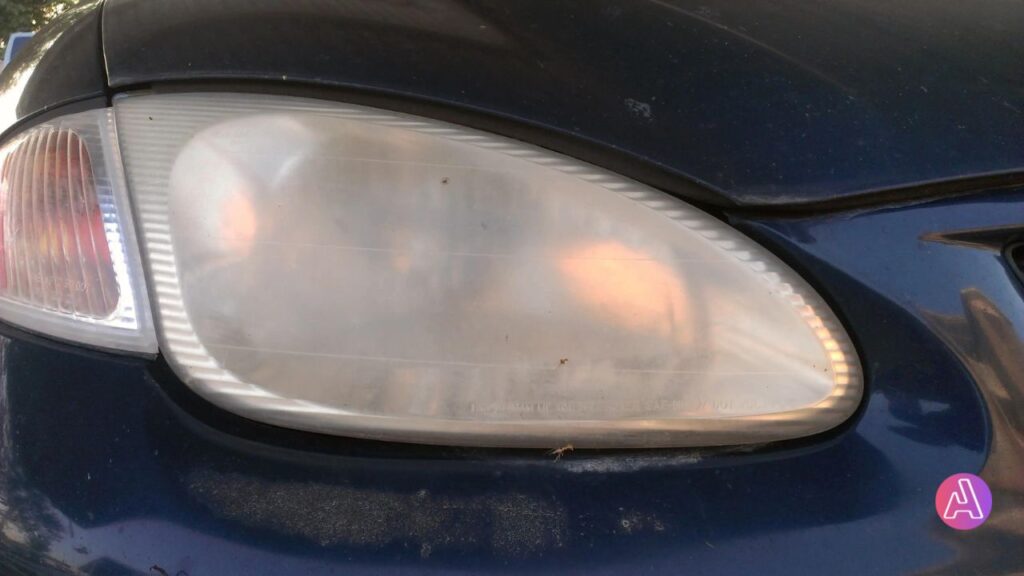
It could be for two different reasons. First is very common and it happens mainly because of dirt.
And the other problem is, this lens on the headlights are made of polycarbonate plastic and even though you can’t see it, this comes with the UV protective coating from the factory. Overtime decoding wears off and then while you’re driving and leave the car outside in bright sunlight the UV rays coming from the Sun is breaking there and the poly Kevin instruction the lens so the color of the lens goes from transparent yellow over time this gets even worse and starts to look terrible
How To Clean Foggy Headlights At Home ?
For the first problem, if you rub your fingers on your headlight and it feels bumpy it feels gritty then you know that the dirt is on the outside of the headlight. If you’ve tried cleaning your headlight and it is still dirty then it may be that the dirt and the yellow is actually coming from the inside and if that’s the case then this technique won’t work for you (Skip to here). But if you rub your finger on there and it does feel gritty and bumpy then this technique is really gonna work for you.
Thigs you need for this technique.
1.Brush.
2.Toothpaste.
3.Gloves.
Step 1.
Where the gloves and take some tooth paste in your hand.(it should be enough toothpaste so you can put it in the whole headlight).